PPL Skills - Landings and Go-Arounds
Contents
Take-off is optional; landing is mandatory
Normal Approach and Landing
The base leg
- Pilot must accurately judge where to place the base leg
- Try to mentally picture the descent path
- If there is strong wind, you might have to turn later due to lower ground speed and steeper descent gradient
- Leave enough distance for a final approach long enough so that you can make a stabilised approach
- Begin the descent after turning onto base
- Before-landing check and gear lowered usually before turning onto base
- Start the turn onto final at approximately 1.4 Vso (stalling speed with landing config)
- This is 56kts in the Cessna 172 (since the landing-config stall speed is 40kts), but most people approach at around 65-70kts, because 56 is really close to the stall speed - just 16kts. Especially in gusty conditions, if there was a sudden drop in wind, the airspeed would be brought either dangerously close to stall speed or possibly even below stall speed
- Full flaps not recommended before landing is established
Final approach
- Make a shallow or medium-bank turn onto final
- Avoid steep turns because the stall speed increases significantly at steep bank angles
- If a steep turn is necessary to line up with the runway, it is recommended that you abort the approach instead
- Line yourself up with the runway
- Start getting used to how a runway looks like in relation to you when you're perfectly lined up
- Even if you're sitting on the left or right of the cockpit, the centreline should look like its going straight towards you
- Add full flaps and adjust power and trim as necessary to maintain a stable approach at 1.3Vso
- Though, again, the approach should be about 65kts in the Cessna 172; refer to the POH for respective aircraft for their recommended approach speeds
- Normal approach gradient is about 3 degrees
- Rough guide: your rate of descent should be your ground speed, divided by two, then multiplied by 10
- eg. if your ground speed is 60kts, your rate of descent should be about 300fpm to maintain the 3-degree gradient
- Pitch + Power = Performance
- You have to manage both pitch and power to get the desired rate of descent
- Using flaps
- Allow you to fly at slower speeds without stalling
- Increase lift at the expense of drag
- Allow you to touch down slower, reduce forces on the landing gear and stop in a shorter distance
- Descents are steeper using flaps
- Can be used if the pilot decides he may overshoot
- Never reduce flaps for undershooting as it will cause a rapid loss of lift and consequent descent
- Avoid lowering flaps all at once - do it in increments
- If flaps were to be lowered all at once, it would cause the aircraft to experience very sudden and large changes in behaviour
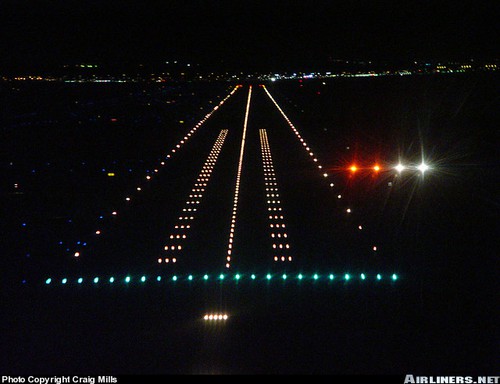
- Aiming point
- Aim for a certain point on the runway
- This point will be closer to you than the actual touchdown point, since the aircraft's descent will become gentler during the flare
- The touchdown point is approximately 400ft after the aiming point for the C172
- Touchdown point should be after the threshold markings, but within the first third of the runway
- This point should remain in the same approximate position on your windscreen throughout the approach until very close to the runway
- The "shape" of the runway from your perspective should look roughly the same to you throughout the approach, again until very close to the runway
- You need to get used to what the shape should look like on the correct descent profile
- Some runways will be equipped with guidance systems to ensure you are on the glideslope (ie. on the right descent angle)
- ILS (Instrument Landing System)
- VASI (Visual Approach Slope Indicator)
- 2 sets of red / white lights. If both are white, too high, if both are red, too low. Aim for one set red, one set white
- PAPI (Precision Approach Slope Indicator)
- 4 sets of red / white lights. Aim for 2 sets of red and 2 sets white.
- As you approach the runway, start focusing on objects that are further away, for example buildings at the end of the runway
- Focusing on close objects will not help you accurately judge your attitude and height above the runway because of the aircraft's speed
- Likely result in over-controlling
- Focusing on objects further away, and keeping the runway in your peripheral vision will give you a more accurate perception of your attitude and height above the runway
- Focusing on objects too far away may also result in inaccurate perception, and will likely result in inadequate control inputs
- As the aircraft crosses the threshold, throttle is brought to idle in most light aircraft
Stabilized Approach
- Means that the aircraft is lined up with the runway, needs minimal changes in airspeed and rate of descent until the flare, and is properly trimmed for this
- This allows the pilot to devote more attention to fine tuning his approach
- Don't focus on any one point but maintain situational awareness, looking both inside and outside the cockpit
Flare
- Used to soften the rate of descent and slow down the aircraft just before the touchdown
- Involves pitching up smoothly and continuously just above the runway
- About 10-20ft for light aircraft
- Typically 50ft for larger airliners
- The rate at which you pitch up depends on speed, height above the ground, and rate of descent
- Eg. If you're approaching a lot more steeply than usual, then the flare might be initiated slightly higher, and a bit more aggressively
- You should aim to touch down on main landing gear at the Vy attitude (ie nose-up at the angle at which Vy would be obtained at takeoff power)
- Care has to be taken not to "float"
- If the flare is executed too aggressively (too much pitch-up too quickly), or at excessively high speeds, the aircraft will "float"
- Airspeed continues to fall and the aircraft may stall above the ground
- This potentially leads to:
- Hard landings
- Running out of runway
- Structural damage
- If the flare had been too aggressive, you should hold off increasing back pressure, or reduce the back pressure
- Increase engine power if necessary to prevent a stall or excessively hard landing
- Light aircraft typically perform the flare with power off
- Remember to shift your focus further down the runway in order to accurately judge height above the ground
Touchdown
- Avoid forcing the aircraft down nose-first
- This usually occurs if speed is excessive
- Hold the aircraft above the runway until speed bleeds off to attain proper landing attitude, or conduct a go-around if there isn't enough runway
- Maintain the nose-up attitude for aerodynamic braking
- Make use of the surface area of the wings to increase drag in order to slow down the aircraft more
- When the aircraft is sufficiently slow that applying back pressure doesn't cause the nose to rise, it is good to pull back on the stick to place more weight on the main landing gear to increase braking effectiveness
Common mistakes
- Not completing the before landing checklists in a timely manner
- Under or overshooting the turn to final
- Poor coordination on turn to final
- Unstable approach
- Poor trim on final
- Failure to adequately correct for flap extension
- Relying on elevator instead of engine power to maintain the glideslope
- Focusing too far / too near resulting in a poor flare
- Failure to hold sufficient back-pressure after touchdown
Normal Approach and Landing - cont'd
Crosswind Landings
- Read this for an introduction to crosswinds
- 2 methods:
- Wing-low, and the crab (more commonly used in commercial airliners)
- Both involve the sideslip
- The Sideslip:
- Basically the aircraft banks into the wind to counter the crosswind
- But opposite rudder is applied to keep the aircraft aligned with the runway
- This is the main difference between a sideslip and a forward slip (see below) - the nose of the aircraft is necessarily aligned with the ground track in a sideslip
- This is vital during the landing
- If the aircraft is not pointed in its direction of travel, the aircraft will skid on the runway, like this
- This may cause structural damage to the landing gear, or a loss of control of the aircraft
- Two related technical concepts: Side-load and cornering angle
- Basically, there will be a point beyond which a tricycle wheel airplane will simply tip over
- The wing-low method
- Involves a sideslip throughout the approach
- The crab method
- Involves crabbing into the wind then switching to a sideslip in the moments before touchdown
- Requires a lot of coordination and finesse but is more comfortable for passengers
- Remember to flare as well
- Touch down
- On one wheel first, followed by the other main landing gear, then the nose gear
- Before the nose gear touches down, you need to neutralise the rudder input on aircraft in which the rudder and nosewheel are linked
- On the rollout, progressively apply more and more aileron into the wind (as per normal during crosswind taxi)
- Weathervaning
- The aircraft usually has a larger surface area facing the crosswind behind the main landing gear than in front
- This causes the aircraft to tend to yaw into the wind
- As forward momentum diminishes, the crosswind becomes more significant relative to the forward velocity of the aircraft and it becomes more difficult to prevent weathervaning
- Maximum crosswind component
- Every aircraft has a maximum demonstrated crosswind component
- For small aircraft, this could be the point where the aircraft cannot maintain alignment with the runway using a sideslip even with full rudder deflection
- Note that this is often different from the actual velocity of the wind because the aircraft is probably not flying at right angles to the wind direction
- Commercial airlines have their own policies on the maximum crosswind component their pilots are authorized to land in
- If the crosswind component exceeds design limits, no landing attempt should be made
- The above is mainly for GA aircraft though the concepts remain the same. In commercial airliners, the crab method is more commonly used, and the plane is pointed towards the runway right before touchdown. Some minimal drift is acceptable, and the bank angle cannot be too big because many commercial airliners have low ground clearance (wing-mounted engines).
- Check this video by a real-life airline pilot explaining crosswind landings / take-offs.
Approaches in gusty conditions:


- Gust factor
- Difference between gust speed and wind speed.
- Eg. if winds are 10kts gusting 20kts, the gust factor is 10
- Add half of the gust factor to the normal approach speed
- Eg. In a C172 with a normal approach speed of 65kts, and the winds are 10kts gusting 20kts, you should approach at 70kts.
- Might want to hold off idling the throttle until touchdown - be cautious with the power settings
Bounced Landings:
- If the landing is particularly hard, the aircraft may bounce
- This is not like how a rubber ball bounces, but is caused by an increase in angle of attack
- This is in turn caused because the tail has downward momentum and continued to sink
- If the bounce is mild, response is similar to floating: increase power, or hold a suitable landing attitude to bring the aircraft in for a smooth landing
- Do not exert forward pressure on the stick to keep the nosewheel on the ground. This may lead to wheelbarrowing or porpoising
- Wheelbarrowing occurs when most or all of the weight of the aircraft is supported by the nosewheel. This could lead to a loss of control or structural failure of the nose gear
- Porpoising simply refers to pilot-induced oscillation of the aircraft. This can be particularly serious when it occurs on landing, when the plane lands multiple times on the nose gear
- If either of this occurs, or if you are not confident of continuing the landing, conduct a go-around immediately
- If not, you could end up like this pilot
- After hard Landings, care must be taken to inspect the aircraft for structural damage
- In crosswind situations, the bounce may cause the wings to level, which, if left unchecked, may cause the airplane to roll away from the wind as it lifts the upwind wing up
- Care must be taken to correct for crosswind after the bounce
Hydroplaning (skidding on wet runways)
- Can occur with even the slightest layer of moisture
- May be exacerbated by braking past a certain speed
- Use aerodynamic braking as far as possible (nose up)
- Apply brakes firmly up til the point you detect a skid, then allow the wheels to roll
The Forward Slip
- What?
- Basically sort of a "skid" through the air by an airplane
- How?
- Can be thought of in two components:
- First bank the wings in one direction
- Then apply opposite rudder to prevent any turning
- Relative to the ground, the airplane is flying straight
- But in the air, it's exposing its side to the oncoming air
- Why?
- Increases drag
- Allows steeper descents without unwanted increases in speed
- When?
- When the plane is a little too high or too fast on the approach
- Fun fact: Gimli Glider
- Air Canada Boeing 767 that ran out of fuel halfway through its flight. The pilot glided it down for a landing on an abandoned airspeed was too high and too fast, but not enough altitude to make a complete 360° turn. Captain Robert Pearson did a forward slip to increase drag and his rate of descent without an excessive increase in airspeed.
- To increase the rate of descent, bank more and apply proportionately greater rudder input to keep from turning. The maximum bank that can be achieved in a slip is therefore determined by the rudder
Short-Field Landing
- Key idea is to approach as slowly as possible
- Follow configuration as recommended by the POH
- Typically involves full flaps
- Precise control of the airspeed and rate of descent is crucial
- Approach airspeed (refer to POH) typically not more than 1.3Vso to minimise or eliminate floating
- If airspeed falls too low, any attempt to increase angle of attack without corresponding increase in power will only result in a steeper rate of descent or worse a stall
- A stabilised approach is essential
- If uncertain about outcome, do not hesitate to go around
- Touchdown should occur at minimum controllable airspeed, at a pitch attitude which would result in a power-off stall
- Keep elevator back pressure as long as it remains effective to maximise aerodynamic braking
- Apply brakes as soon as the wheels touch down to minimise landing roll distance

Soft-Field Landing
- Key idea is to land as smoothly and slowly as possible
- Approach similar to a normal, long, surface
- Hold the aircraft just above the ground as long as possible to slow down by gradually increasing pitch
- Keep power on during the touchdown
- Idea is to touchdown with most of the weight still supported by the wings
- Touch down slow, with power, and nose-up
- Using pitch and power, control the rate at which weight is transferred to the landing gear
- Avoid braking
- Be ready to conduct go-around if conditons aren't favourable, even after touching down
- Often, an increase in power is needed to keep the aircraft moving on the soft surface

Rejected Landings / Go-Arounds
Sometimes also known as balked landings. Some common reasons:
- Windshear
- Mechanical Failure
- Unstabilized Approach
- ATC instructions
- Traffic on the runway
It is important to note that conducting a go-around is not indicative of one's poor piloting skill. A pilot should be ready to execute a go-around any time there is a need to. Procrastination will make performing a safe go-around harder, and a decision to press on with the landing when not confident of a safe landing is simply foolish.
Go-Around mantra: Power, Attitude, Configuration
Power

Go-Around Procedure specific to the Cessna 172SP:

Go-Around mantra: Power, Attitude, Configuration
Power
- Simply apply full power smoothly
- Sudden application of full power may cause some engines to fail
Attitude
- Resist the urge to pitch up, which may result in a stall
- Keep the nose down until the airspeed increases
- Rough trim to reduce any adverse pressure and make more precise trim when the airspeed and pitch attitude stabilises
- Anticipate sudden nose-up pitch and a yaw to the left
- Note that the ground effect may give the illusion of improved performance, but this will deteriorate upon climbing
Configuration
- Once a climb has been established, raise flaps to takeoff position or as per manufacturer's recommendations
- Only raise flaps one notch at a time or a sudden drop may result
- Once climb is certain and flaps have been settled, raise landing gear (last priority)
Go-Around Procedure specific to the Cessna 172SP:

Comments
Post a Comment